

Configure Delphi and RedHat or Ubuntu for Linux development.
One of the more exciting features of the pending 10.2 release of Delphi and RAD Studio, is support for targeting Linux. In this post, I’m going to step you through setting up your development environment to deploy applications to either RedHat Enterprise or Ubuntu 16.04.
From here in I’ll refer to RAD Studio, Delphi and C++Builder as synonymous. Note that neither Delphi or C++Builder have been publicly released for Linux yet, but at the time of writing there is a Delphi beta available for subscription update users – ie most likely any active Berlin user – and a C++Builder beta will follow it soon.
This post is going to become quite lengthy, and there may be parts not relevant to you. For example, if you already have a running RedHat server, you likely don’t need me to explain how to install one. Similarly, you may already be familiar with some virtualization software and don’t need instructions on installing Oracle’s VirtualBox, I’ll break this post into sections so that you can skip to the parts that matter most to you.
- Selecting a Linux distribution.
- You will need
- Installing Oracle’s VirtualBox
- Creating a Virtual Machine for development.
- Installing RedHat
- Installing Ubuntu
- Deploying the PAServer (required)
- Deploying an application.
- The scratch-directory.
There are a lot of sections to cover here!
As this post is long with several instructions, I’ll go relatively light on detail here and provide the installation options and configuration which works for me. If you have suggestions, or encounter problems following these instructions, or better yet, solutions to problems, please register and comment against this blog post so that others can benefit from your experience.
Lets get started.
Selecting a Linux distribution.
Your first decision is going to be which distribution (or ‘flavor’) of Linux you’d like to use for your application deployment. The Delphi / RAD Studio beta offers two options which will be officially supported, RedHat Enterprise and Ubuntu 16.04. (*note other flavors of Linux may work equally well, but due to there being wide variation among the available Linux based operating systems, official support is limited to these two popular distributions).
So what’s the difference between the two distributions? I don’t plan to go into lengthy detail on this subject, you can research each platform for yourself to decide which you’d prefer to use, but I’ll give you some basic pointers to get started.
A long time ago, as Linux operating systems were becoming popular, two leading distributions began to emerge from the fog of options. These were Debian and RedHat. Debian was founded by Ian Murdock under a manifesto which detailed it’s open source and open standards nature, and under the GNU Public License with intentions to encourage contributions, towards the development of the operating system, from it’s user community.
In contrast the Red Hat company released their “RedHat Commercial Linux”, which was later renamed as “RedHat Enterprise Linux (RHEL)”, with a more commercial model but along-side free to use, cost free editions named Fedora or Centos. Their model seemed aimed at merging the benefits of both commercial and open source development, while promoting the relevance of Linux to Enterprise customers. Red Hat therefore offer commercial enterprise support for RHEL, while honoring the open source nature of Linux with Fedora and/or Centos. If you select RedHat as your target, you can get started for free with their Developer Subscription, but will need to pay for a commercial license before deploying your application within your Enterprise. Of course, you could try using one of their cost free options of Fedora or Centos, which ought to be largely compatible, but these aren’t officially supported either by RedHat software nor by Embarcadero.
Ubuntu is a fork of the Debian operating system which is developed and maintained by the UK company Canonical Ltd, originally founded and funded by Mark Shuttleworth, an entrepreneur from South Africa. Canonical also offer commercial support for enterprise users, however, due to the manifesto first laid out for the Debian system by Ian Murdock, there is no commercial version of the operating system it’s self. Home users and community members get the same version of the operating system that commercial customers do, but with community based support rather than commercial support. If you select Ubuntu as the target for your application, you can develop and even deploy your application without paying for the operating system, but if you do, you’ll be at the mercy of community support having foregone the option of commercial support.
You will need
- RedHat or Ubuntu.
Unless you have an existing server, you’ll need an ISO image (disk image) of either RedHat or Ubuntu ready to be installed onto a virtual machine.
For RedHat, I’ll be using a developer edition, which may be downloaded here (requires cost-free subscription): https://developers.redhat.com/blog/2016/03/31/no-cost-rhel-developer-subscription-now-available/
For Ubuntu, I’ll be using the server edition (LTS) which may be downloaded here: https://www.ubuntu.com/download/server - Virtualization Software.
I’ll be using Oracles VirtualBox which may be downloaded here: https://www.virtualbox.org/wiki/Downloads
Download both VirtualBox for your windows host, as well as the extension pack. - WinSCP (SFTP)
We’ll need a way to transport the PAServer portion of the RAD IDE onto the linux machine. For this I plan to use WinSCP which uses SSH to transfer files to our linux server. Both versions of linux support an SSH server which makes this convenient. You can download WinSCP here: https://winscp.net/eng/download.php <- *Warning* While this is an excellent free tool, this is an irritating website with ads which appear as download links, be careful to download WinSCP and not something else. - Delphi or RAD Studio 10.2 Enterprise edition or higher.
Apologies to those of you that are not on the Beta Program and will therefore have to wait for the official release, hopefully sufficient time has passed between me writing this, and you reading it, that you have access to a Linux supporting version of either Delphi or RAD Studio.
Installing Oracle’s VirtualBox
Installing VirtualBox is quite easy, but before you get started I should give you a warning. The installation of VirtualBox will involve installing software drivers for graphics, audio, networking and other. This will interrupt normal use of your system. For example, if you are downloading something in the background, your download may be interrupted by the installation of the network driver. If you’re listening to music or perhaps an audio tutorial on the integration of procedural generation techniques into your next video game development project, or some other audio, it may freeze while the audio drivers are installed. In short, stop whatever you’re doing and close as many programs as possible before getting started…

Click “Next”

Click “Next”
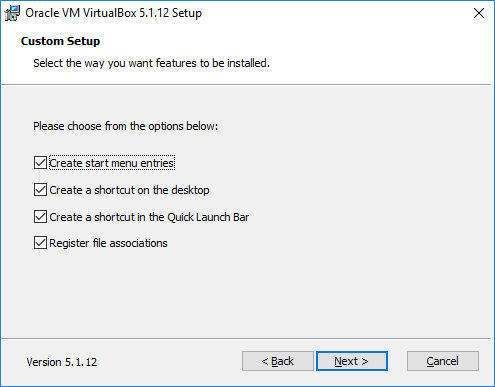
Click “Next”

Click “Yes”

Click “Install”

Sit and wait, while agreeing to requests from windows to run the installer.
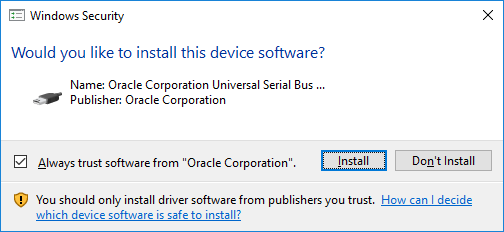
If the checkbox for “Always trust software from ‘Oracle Corporation’” is not checked, consider checking it so that you don’t get a warning for each driver.
Click “Install” to continue.

Click “Finish”

VirtualBox should now open and appear as in the screenshot above.
At this point you may be presented with a dialog box like this one…

This dialog is asking if you’d like to download the VirtualBox extension pack. If you followed my advice in the “You will need” section, you’ll already have this downloaded, otherwise hit “Download”. If you already downloaded the extension pack, simply double click on the file you downloaded to install it.

Creating a Virtual Machine for development.
Before installing RedHat or Ubuntu into a virtual machine, we must create a suitable virtual machine for the OS to run on.
Lets build a virtual machine within the Oracle VM Virtualbox Manager…
Click “New”
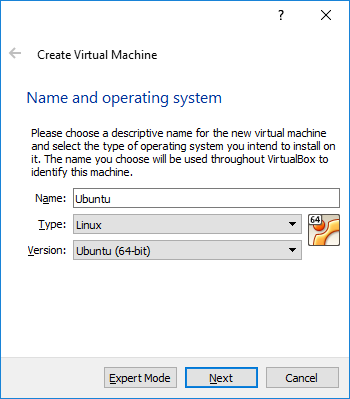
Give your virtual machine a name. You can call your VM anything you like, however, I tend to name my machines after the OS that I’ll be installing, so in the screenshot you can see that I named this one “Ubuntu”.
From the drop down boxes (if they don’t update automatically based on the name), select “Linux” and then either “Ubuntu (64-bit)” for a machine intended to run Ubuntu, or “Red Hat (64-bit)” for a machine intended to run Red Hat.
Then click “Next”

Now you need to specify the amount of your system RAM which will be allocated to the virtual machine when it runs.
Both RedHat and Ubuntu require 4096MB (4GB) or higher.
Click “Next”

Ensure “Create a virtual disk now” is selected and click “Create”

VirtualBox creates a file on your disk which represents the entire hard-disk of the virtual machine (on which your Linux operating system will run). VirtualBox supports multiple formats for this file, some of which are compatible with other virtualization software such as “VMDK” which is compatible with parallels for example. The “VDI” file format however, is the native file format for Virtualbox and therefore provides the greatest flexibility when working with Oracle VirtualBox. Unless you are planning to share your image with other virtualization software, go ahead and select “VDI (VirtualBox Disk Image)” and click “Next”

Assuming you’re creating a VDI image (see previous step), you’ll be given the option to create an image file which is either “Dynamically Allocated” or has a “Fixed Size”. In the next step I’ll explain these options, but for now, simply select “Dynamically allocated” and click “Next”. (Or read ahead to find out why…)

In this step you’re asked to provide a name for the disk image that will be created for your virtual machine. By default it will match the machine name, which is why my screenshot shows “Ubuntu”.
You’re also asked to specify a file size for the virtual machine, and I’ve manually typed “100GB” into the size edit box.
In the previous step we decided if the hard disk image file would be a “Dynamically allocated” or “Fixed size” image. Had we selected “Fixed size” and then specified 100GB here, an empty 100GB file would be generated to host the virtual machine. This is useful in cases where you’d like to ensure a particular amount of space to your virtual machine, but if your virtual machine only ever uses 40GB of the virtual disk for example, you’re wasting a whopping 60GB of your hosts disk space.
This is why we selected “Dynamically allocated” in the previous step, the 100GB size specified in this step will not consume 100GB of disk space immediately, but rather, it’ll allow the virtual hard disk to grow up-to a maximum of 100GB.
Our linux OS is likely to require somewhere around 30-40GB for a minimal install, so setting a size larger than this means that only the space our virtual machine needs will be used. Be cautious not to set this size too small however, as the OS will fail to install if there is insufficient space permitted to it.
Select an appropriate size and click “Create”

You should now have a virtual machine listed in the VirtualBox Manager. In the screenshot you can see that I’ve created two virtual machines, one for hosting Ubuntu and the other for hosting RedHat.
We’re not quite done though, we need to configure the network settings for our guest machine, so that we’ll be able to access it from our host machine running RAD later. Ensure your virtual machine is highlighted by clicking on it, and then click on “Settings”

Click on the “Network” tab on the left.

Alter the “Attached to:” drop down box from “NAT” to “Bridged Adapter”

Roll down the “Advanced” section, and set the “Adapter Type” drop down box to read “Paravirtualized Network (virtio-net)”

Now, we’ll need to insert our Ubuntu or RedHat installation media. That’s the ISO file you downloaded for the OS back in the “You will need” section of this post. Switch to the “Storage” tab on the left…

Click on the icon named “Empty” under the “Controller: IDE” section, it looks something like a CD.

On the right, under “Attributes” you can see that we have an “Optical Drive” which reads as “IDE Secondary Master”, and to the right of that drop down is another icon which looks like a CD, and has a drop down arrow. Click on that CD shaped icon and select “Choose Virtual Optical Disk File…”
NOTE: Remember how to find this context menu. As you can see there is also an option to “Remove Disk from Virtual Drive”, which I’ll refer you back to at the end of either of the sections “Installing Ubunutu” or “Installing RedHat” depending on which you decide to follow. You’ll need to come back here and remove the installation media when the installation of Linux is complete.

Now browse to where-ever you stored the linux installation image file (the .ISO you downloaded during the “You will need” section), select the ISO file and click “Open”…
(* Your ISO filename may differ from the screen shots. In particular, I’ll be installing Ubuntu server edition but the screen shot shows desktop. Please ignore this, it was an incorrect file download, I’ll be using the server edition in my instructions later)


Finally, click “Okay” to come back out of the settings for your virtual machine.
You are now ready to begin installing the Linux operating system of your choice onto your virtual machine. Again, make sure your virtual machine is highlighted by clicking on it, and click the “Start” button…

Now, If you’re installing RedHat, proceed with the next section of this post for installation instructions. If you’re installing Ubuntu, go ahead and skip to the “Installing Ubuntu” section.
Installing RedHat
Okay, so you’ve created a virtual machine, inserted the “RedHat” installation disk into it, and clicked “Start” to fire it up…
You’ll first see this menu with a counter timing down…

Either wait for the counter to finish, or click inside the virtual machine window and press [ENTER] / [RETURN] to begin the installation. After a few seconds your screen should fill with text as the system performs it’s startup checks, wait a little longer, eventually a language selection dialog will appear…
As a side note – you may also have lost your mouse pointer to the virtual machine at this point. The virtual machine has acquired the mouse device for it’s self and will not give it back until you hold down the right-hand [CTRL] key on your keyboard. This key is known to VirtualBox as the “host” key. Extensions for the guest operating system can be installed which prevent it from grabbing the mouse, and instead share the mouse pointer between your host machine and the guest operating system, but they can’t be installed until AFTER the guest operating system is installed. So for now, remember the right-hand [CTRL] key.

Select the language you’d like to use by default within Red Hat. Obviously you must make the most appropriate selection for yourself, I’ll be proceeding in English (US). Having made your selection, click “Continue”..

At the next dialog you may see several warnings. Give it a moment and most of the warnings should go away by themselves (if they do not, you’ll need to investigate those further with the Red Hat documentation). The one warning which remains is over the “Installation Destination” icon. Click this icon…

The warning we clicked on was that we’d not configured the way in which our virtual disk drive should be partitioned. By clicking on the warning we’re brought to the disk partitioning dialog. You need not do anything to this dialog, the default partitioning options should be fine for our purposes, so simply click the “Done” button in the top left corner and return to the previous summary dialog…

The default partitioning configuration is now applied for us, the warning is gone, and the “Begin Installation” button has appeared.
Before we proceed, lets configure some network settings too. Click on the “Network & Host Name” icon..

Simply switching the Ethernet connection (eth0) to the “On” position should be sufficient here. Note that an IP address should be acquired automatically when you switch on the connection…

If an IP address has not appeared, then perhaps you do not have DHCP enabled on your network? You’ll need to check the documentation for RedHat on how to configure a network connection later, but for now, proceed with the installation.
Assuming the IP address did appear, make a note of the address somewhere, you’ll need it later.
Click “Done” in the top right corner to return to the main configuration dialog.
Now click on “Begin Installation”

At this point the installation has begun, and a progress bar proceeds along the bottom of the screen. At the top of the screen however, there are two options for configuring a “Root Password” and for “User Creation”. We’re going to perform each of these actions in turn while we wait for the installation to complete.
Start by clicking on the “Root Password” icon.

You’ll need to enter a sufficiently complex password into the “Root Password” box, and repeat it in the “Confirm” box. When you’re done click the “Next” button at the top left of the screen.
Note: You can override the password complexity by entering a simple password and clicking the “Done” button twice instead of just once.

Now click on the “User Creation” button.

On this page provide your name, a username and set the password fields.
Most importantly, check the “make this user administrator” checkbox.
Click on “Done” top left to proceed with the installation.

Having set the root password, and created an administrative user account, we leave the installer running until the installation completes and the “Finish configuration” is enabled. Go ahead and click on “Finish configuration”.

Wait some more

When the “Reboot” button appears, go ahead and click on it.
Your virtual machine should restart, wait for a while as it starts up and you’ll eventually be brought to this prompt…
Note1: Depending on the RedHat version that you’re installing, you may be taken to a graphical login instead.
Note2: At this point it would be a good idea to go remove the installation media from the virtual machine settings page (remember, the item I told you to remember how to get to in the section on setting up virtual box?). If your virtual machine does not start up to a login prompt at all, it’s likely because the installation media is still in, turn off the machine (click to close the window) and remove the installation media before clicking on ‘start’ again.

At this point, type in the username for the user you created during installation and press [ENTER] / [RETURN], then enter the password for that user and again [ENTER] / [RETURN]… (Or if you have a graphical screen, log in using that)

You’ll either be brought to a prompt resembling the one above, or you’ll be logged into a graphical desktop.
If you are brought into the graphical desktop, open a terminal session from the menu in order to continue with the remaining instructions.
TIP: [CTRL]+[ALT]+[T] is a common shortcut for opening a terminal session in many Linux graphical desktops.
According to the documentation, you should now be prompted to register your system using your RedHat subscription (the one you signed up for in order to download RedHat). In my case this did not happen, but it can be initialized from the command line using the following instruction…
subscription-manager register --username username --password secret --autosubscribeYou may be asked for your root password in order to register…

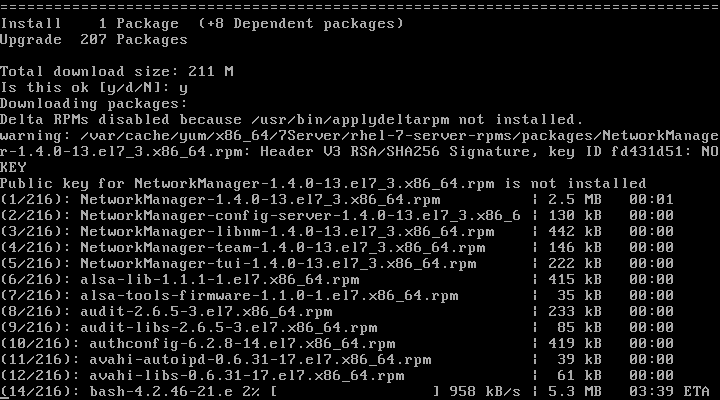
Lets check that the subscription is valid and working by updating the system software.
Enter the instruction:
sudo yum update*Note: Whenever you enter instructions that begin with “sudo” you may be prompted for your password again, if so, enter the password for the user account you created during installation.
You should see a number of packages being discovered…

You’ll then be asked to confirm that it is okay to download and install these packages….

Press “Y” to allow these updates to be installed…
(You may be prompted several times during the process, just keep on pressing “Y” until it’s done..)

Congratulations, RedHat is installed and up-to-date. You’re almost ready to deploy software onto it, but first, there’s a piece of information you’ll need. You need the IP address of the RedHat server. You may have made a note of it during installation, but in-case you did not, type the following instruction:
sudo ip addr showYou should be presented with a screen which looks something like the screenshot below. You need the IP address for “eth0” which I’ve highlighted in the screenshot..

On a DHCP network your IP address can change, typically if you reconnect to the network or reboot the system, though it usually remains the same. Make a note of the instruction in-case you need to find the IP address again. You can also discover this information from the PAServer application as we’ll see later. For now, write down the IP address (in my case 10.90.1.78) as you’ll need it again soon.
Now you’re ready to deploy the “PAServer” application to your RedHat server. Go ahead and skip to the section entitled “Deploying the PAServer”.
Installing Ubuntu
So at this point you’ve created a virtual machine to host Ubuntu, inserted the installation media, and hit the Start button to fire up your virtual machine. Lets install Ubuntu…
Note1: The Ubuntu server edition installer is a text based UI which you can navigate using the cursor keys, [TAB] to cycle options, and [RETURN]/[ENTER] to accept an option.
Note2: When you click inside the virtual machine window, virtualbox will grab your mouse and not release it back to you unless you press the right-hand side [CTRL] key on your keyboard. This key is known to virtual box as the ‘host’ key. There are extensions which can prevent virtual box from claiming exclusive access to the mouse, but they must be installed into the guest OS which we haven’t installed yet.
The first dialog you’ll be brought to, looks like this..

This dialog is for selecting the language of the installer (not the OS once installed), go ahead and select the appropriate language for yourself, I’ll be selecting English. Then press [ENTER]/[RETURN] to accept this option…

Now we have the Ubuntu boot menu, select the “Install Ubuntu Server” option…

This language dialog allows you to select the default language used by the Linux OS when it’s installed. Again, select an appropriate option and continue.

Select your location and continue.

The Ubuntu installer is now going to attempt to detect which keyboard you have. Go ahead and select “Yes” and continue, you’ll be prompted with a series of requests to press particular keys on your keyboard, or asked if your keyboard has certain keys. Proceed through the options which look like these screen shots…


At this point the installer should have detected the appropriate keyboard option for you, in my case “US”, assuming it’s correct, select “Continue” and proceed..

Progress bar, just wait.

The Ubuntu installer now wants to name your machine on the network. Enter something appropriate and continue.

The Ubuntu installer is now going to create a user account for you to sign into. Go ahead and enter your name, or that of the person that will be using this virtual machine, and continue.

Enter a username for your user account and continue..

Enter a password for your user account and continue…

Re-enter the password, and continue…

Either option is fine, but as I’m not particularly concerned with the security of the file system (It’s a development machine, not a production server), I’m selecting to not encrypt the home directory.

Select your time zone, and continue..

Progress bar, wait some more.

The Ubuntu installer is asking how you’d like to partition the file system, as this file system is a dedicated image file, select “Guided – use entire disk and set up LVM” and continue.

Select “SCSI3 (0,0,0) (sda) – 107.4 GB ATA VBOX HARDDISK” and continue..

Select Yes, continue…

Continue…

Select Yes, and continue…

More progress bar, wait some more…

Select “Continue”…

Select “Install security updates automatically” (unless you know what you’re doing and would rather not), and continue…

Another progress bar, wait some more…

On this dialog, be sure to enable “OpenSSH Server” using the [SPACE] key to turn the option on. Continue…

Another progress bar, wait some more!

Select “Yes” and continue… (This is installing the boot loader into your virtual file system).

Another progress bar… You know what to do here.

At this point, the installer is asking you to remove the installation media. Do you remember I told you how to do this when we inserted the installation media in the first place? In-fact, more than likely you don’t need to do this because virtual box will prefer rebooting from the hard-disk now that there is a boot loader, but it’s a good time to do it, so go remove the ISO image from the virtual box settings. Then continue…

Oh wow, a progress bar! Stand-by…
Your machine will restart it’s self, and so long as the installation media was removed (and likely if it was not) you’ll see this dialog…

Either press [ENTER]/[RETURN] to boot into Ubuntu, or wait for the timer to count down, it’ll do it automatically for you.

Wait as the system starts up…

Eventually, you’ll find yourself here at the login prompt.
Go ahead and log in using the credentials you setup during the installation process…

Okay, before we go any further, we need to know if your system correctly joined the network and has an IP address.
Type this instruction to check… ifconfig

My network interface is named ‘enp0s3’ yours may be different (ignore the interface named lo, that’s the loopback), and on my system I have an IP address of 10.90.1.98. You’ll need to make a note of your IP address. If your system does not have an IP address or is missing a network interface, it’s possible your network does not have DHCP enabled, or something else went wrong. Refer to the Ubuntu documentation to configure a network interface.
Now it’s time to perform some updates and software installation to prepare the Ubuntu system for use.
Start with:
sudo apt-get updateNote: Whenever you enter an instruction that begins with ‘sudo’ you may be asked to re-enter your user password.

If all goes well, your screen should look like the screen shot above, we’ve successfully downloaded the package catalog for Ubuntu, so now lets perform updates …
sudo apt-get upgrade
You may be prompted “Do you want to continue? [Y/n]” one or more times, simply press “Y” for each prompt.

A lot of text should pour up your screen, wait for it to finish and you’ll be returned to the prompt. Look for error messages in the last few lines of text, if you see any, consult the Ubuntu documentation. If all went well, lets continue to do a distribution upgrade…
sudo apt-get dist-upgrade
Again, press “Y” for any prompts..
When the process is complete, we’ll install the dependency packages for the PAServer which allows communication between the RAD IDE and the Linux system…
sudo apt-get install joe wget p7zip-full curl build-essential zlib1g-dev libcurl4-gnutls-dev
Agree to any prompts with “Y”
At this point we’ve installed all of the packages we need, lets perform a couple of maintenance instructions to clean up the installation system.
sudo apt-get autoremove
and
sudo apt-get autoclean
And we are at last all done, proceed on to “Deploying the PAServer”
Deploying the PAServer (required)
The PAServer, or “Platform Assist” server, is a piece of software which ships with RAD Studio / Delphi which may be deployed onto target platforms, in order to provide the RAD IDE with a means of deploying and debugging applications on them. The Linux version of the PAServer may be found in the following directory after installing RAD into it’s default location…
“C:\Program Files (x86)\Embarcadero\Studio\19.0\PAServer”
Note: if you’re using a newer version of RAD, simply adjust the version number in the path according to what you have installed.
The PAServer application for linux is contained in an archive file named “LinuxPAServer19.0.tar” but it’s little use to us sitting in this tar file on our windows machine. We need a way to move it over to the Linux target machine. This is where WinSCP comes in:
WinSCP is an application which can connect to any Linux computer which is running an SSH daemon (that’s SSH server to windows folks), and can then transfer files to and from that computer. You should have downloaded WinSCP back in the “You will need” section of this post, so go ahead and double click on the installer and lets install WinSCP…

Click “Accept >”

Select “Typical Installation (recommended)” and click “Next”

Select the “Commander” interface, this is a preference you may alter if you wish, but my instructions will be for the commander interface.
Click “Next”

Click “Install”

Remove the check box before “Open Getting started page” unless you actually would like to go read the manual 🙂
Click “Finish”
WinSCP will now open and present you with a login screen which looks something like this..

Enter the IP address of your Linux server into the “Host name:” box, but omit the “User name” and “Password” boxes. These boxes are useful if you wish to save the machine IP and credentials for easier login next time, but for the sake of these instructions we’re only going to connect to our Linux server once from WinSCP…

If presented with this warning, click “Yes”. This is importing the security certificate which is used to encrypt the connection between WinSCP and the server.

Enter a username to connect to your linux server with (the one you setup during installation if you followed my guide).
Click “OK”

Enter the appropriate password and click “OK”
If all goes according to plan, you should see WinSCP logged into your server, something like this…

On the left of the WinSCP window you will see a directory browser looking at some location on your computers local disk, and on the right you’ll see a directory browser looking at the home directory for your user on your Linux server. You can navigate these browsers and drag and drop files from either side to the other to have them uploaded or downloaded as necessary.
Lets use this to upload the PAServer application.
On the left side of WinSCP, browse to the location of the PAServer install file:
“C:\Program Files (x86)\Embarcadero\Studio\19.0\PAServer”

Now simply drag the “LinuxPAServer19.0.tar” file from the left to the right side of WinSCP…

Click “Ok”

And as you can see, the PAServer install file has been copied up to your server.
If you’re not still logged into a terminal session on your server (from having followed my guide for installation), go and log into your server now using the same user that you used to connect from WinSCP, and enter the instruction
lsYou should see the PAServer install file listed…

The .tar file listed is an archive file, (think .zip file but without compression if that helps), we need to unpack it.
Type the instruction..
tar xvf LinuxPAServer19.0.tar
You’ll see a list of the files that were decompressed, and if you type the “ls” instruction again you’ll see…

It may be difficult to see in the screen shot due to the aweful default color scheme, but along side the “LinuxPAServer19.0.tar” file a new directory has been created “PAServer19.0”
We’re going to change into that directory with the change directory (cd) instruction and then issue the “ls” instruction again…
cd PAServer19.0 ls
At this point, if you’re running a RedHat server there are a couple of additional instructions you’ll need to run before we can start the PAServer running. You need to open a hole in the network firewall through which the PAServer can communicate with the RAD IDE.
Skip these instructions if you’re running Ubuntu (by default the ubuntu filewall is disabled)
sudo firewall-cmd --zone=public --add-port=64211/tcp --permanent
sudo firewall-cmd --reload
Ubuntu users that skipped the previous instructions, rejoin us here.
Now it’s time to run the PAServer, enter the following instruction.
./paserver
You’ll be asked to provide a profile password, this password is optional, and so for these instructions I’m going to suggest you simply press [ENTER] / [RETURN] to leave it blank. If you do enter a password here, you’ll need it later when configuring the RAD IDE to communicate with the PAServer.

The PAServer is now running and is ready for the IDE to communicate with it.
In order to communicate with the PAServer, your IDE will need the IP Address of the Linux server, which by now you already have, but for good measure type the “i” instruction into the PAServer command prompt..

Tip: Remembering that you can use the “i” instruction within PAServer can be useful if you later reconnect the server to your network or reboot, and find that the IP address has been updated by your DHCP setup.
Deploying an application.
Lets put together a simple “Hello World” application so we can deploy it to our Linux server and see it working.
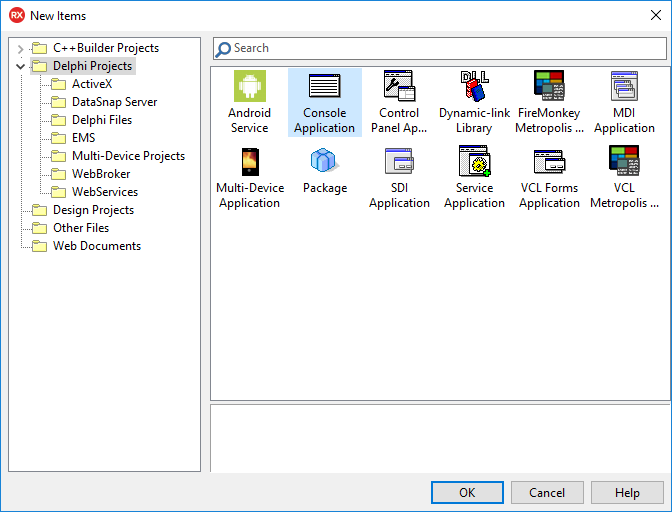
Within RAD, go to “File / New / Other”

Select the “Delphi Projects” branch on the left, and “Console Application” on the right, then click “OK”
Beneath the green commented “TODO” line of the template application, add the following two lines of code.
Writeln('Hello Linux World'); Readln;Your program should look like this…

Under the Project Manager (top right) right click on “Target Platforms (Win32)” and select “Add Platform”

Select “64-bit Linux” from the drop down box and click “OK”
(Make sure the check box “Make the selected platform active” is checked)

Press the “Run with debugging” button (or press F9 on your keyboard).

You’ll be presented with the following dialog…

Give your deployment profile a name, I’ve named mine “deploy_linux”, and press “Next”

Enter the IP address of your linux server, and click the “Test Connection” button.

If you see this dialog indicating that the connection succeeded, congratulations! If you do not, you’re going to have to retrace your steps to figure out what you did wrong, your IDE is unable to talk to the PAServer on your Linux server.
Click “Ok” and then click “Finish”, you should see a dialog like this one..

Make sure everything looks correct here. In particular, the “Select an SDK Version” drop down box should reflect the flavor of Linux you are targeting. Then click “OK”

After the appropriate SDK has been imported, you should be presented with a dialog similar to the one above. On my system, because I’ve deployed to Linux previously, there is a lot less output than I would expect on yours. Once done, click “Close”
At this point, your IDE should switch into debug mode and the following console output should appear at the bottom of the IDE event log…
(If this does not happen right away, give it a moment.)

Congratulations, you just deployed a Delphi application to a Linux server!
( You can hit “stop debugging” in the IDE now, it’s not going to do anything else 🙂
The scratch-directory.
At this point you’ve seen an application deployed to your linux server, but the console output was redirected through the PAServer back to your IDE. What if you’d like to see the application running on the linux server it’s self?
Well, log into your server and navigate back to the PAServer directory (you’re already there if you’ve followed this guide sequentially, just press “q” followed by [ENTER]/[RETURN] to quit the PAServer), and issue the “ls” instruction once more…

Again, it’s difficult to see because of the color scheme, but a new directory has been created named “scratch-dir”, repeatedly issuing “cd” and “ls” commands, you can navigate down into the scratch-dir and it’s sub-directories until you eventually locate the executable file for your project. In the screenshot named “Project1” as yours ought to be. Note it does not have a ‘.EXE’ extension as this is specific to MS Windows…

Now you can issue an instruction to run this project on the server…
./Project1
And there it is, your Hello World Application running right there on your Linux server!
Go forth and make Linux applications with Delphi.
As always,
Thanks for Reading!
2 thoughts on “Configure Delphi and RedHat or Ubuntu for Linux development.”
Comments are closed.